Pages

Tuesday, February 7, 2012

How to fix TeamViewer (Commercial use)

I saw that many users having problem with Team Viewer commercial use, so i decided to make a post on how to fix this problem

Here are the quick steps to get rid of “Commercial Use Suspected” warning and continue to use the teamviewer as a free version. The instructions specified here, are intended for educational purposes only. Never use teamviewer for commercial purposes without proper license.

Teamviewer Commercial Use Suspected Warning Message : 

image_2313908.original.jpg (597×179) 

Step 1 : Close teamviewer if its running on your pc

Step 2 : Click Windows Start > Run and Type %appdata% now find teamviewer folder and delete it.

image_2313909.original.jpg (583×295) 

image_2313910.original.jpg (584×257) 

Step 3 : Beware, This step is very important and you have to follow instructions with caution. 
Click Windows Start > Run and enter “regedit” and click OK. 
Find the registry entry located at HKEY_LOCAL_MACHINE > SOFTWARE > teamviewer and remove the teamviewer registry folder.  
image_2313911.original.jpg (584×289)
image_2313912.original.jpg (582×275)

Now restart the computer, run teamviewer and connect with anyone else remotely.
There is no more pop-up's of Commercial Use Suspected warning and its gone now.
Enjoy !!


Monday, February 6, 2012

Root & Unroot Galaxy ace S5830

Getting the ROOT of the rights and removing them to the Galaxy Ace Samsung GT-S5830 IRoot Instructions for obtaining the right:
 1. Download the file update.zip
2. We throw it in the root of the memory card
3. Turn off your phone
4. Hold buttons simultaneously and hold until the Recovery: Central + volume up
5. Get into the menu, Recovery, consisting of 4 items:
    system reboot now (reboot phone)
    apply update from sdcard (install update)
    wipe data / Factory reset (reset to factory settings, removed all of the phone
    (memory card not touch))
    wipe cache partition (format the system partition / cache)
6. Choose item apply update from sdcard
7. Window appears select the update (memory card)
8. We choose our update.zip
9. Next Reboot system now (if, after installing update.zip reboot the phone itself, then this step is not necessary)
10. Done If all goes well, the menu icon should appear superuser


How to remove Root of rights:
1. Download the archive unroot.zip
2. We throw it in the root of the memory card
3. Turn off your phone
4. Hold buttons simultaneously and hold until the Recovery: Central + volume up
5. Get into the menu, Recovery, consisting of 4 items:
    system reboot now (reboot phone)
    apply update from sdcard (install update)
    wipe data / Factory reset (reset to factory settings, removed all of the phone 

    (memory card not touch))
    wipe cache partition (format the system partition / cache)
6. Choose item apply update from sdcard
7. Window appears select the update (memory card)
8. We choose our unroot.zip
9. Next Reboot system now (if, after installing the phone itself unroot.zip rebooted, 

    then this step is not necessary)
10. Done If all goes well, the menu icon should disappear superuser

 Zip files

Why Your Company Needs To Hack Itself more Remotely start your car using an Arduino


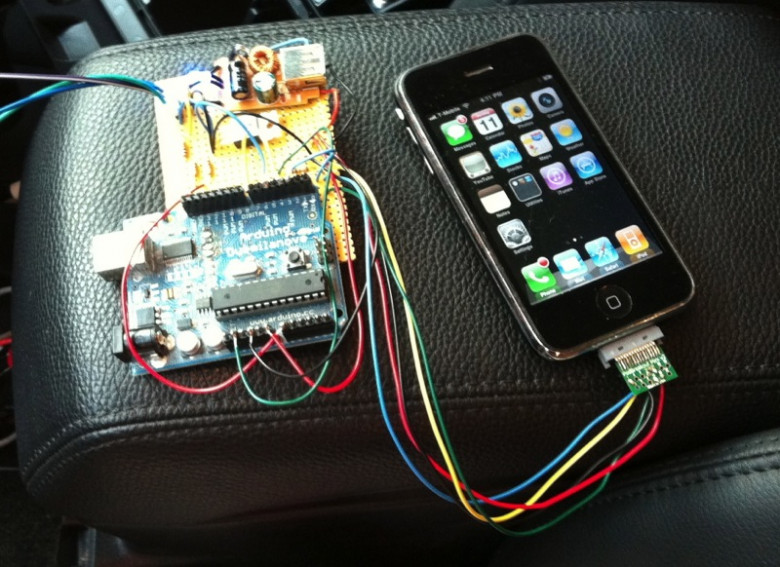
http://biobug.org/blog/wp-content/uploads/2011/12/Image.jpg
Credit: Blobug
This DIYer had a 1st generation iPhone lying around, so he decided to put it to good use.  You can use any phone to accomplish this, even a $10 prepaid phone.  An SMS to the iPhone goes through an Arduino which tells yours car to start or stop from anywhere.  There’s some custom circuitry and programming which is all included in the instructions. When a text message is sent to the iPhone, the iPhone tells the Arduino to start the engine, and the iPhone sends a message back reporting that the start has commenced.

Requirements:
An old jailbroken iPhone, an Arduino, iphone breakout board (I used a PodBreakout Mini) 4x 10k resistors, 1x TIP120, a 5 volt switching supply cell charger (easier than building one), some wiring ability and a general understanding of unix/perl/arduino.

The code:
You can get the code to make it all work here. (SMSresponder.pl, com.SMSresponder.startup.plist and
SMSresponder is a perl script that runs in a loop. Every 30 seconds it checks for a new message since the last time it ran. place it in /var/root/bin/ (you’ll need to create that directory) as this is where the startup system looks for it. You can put it somewhere else, just edit the plist to match.


PHP security patch creates critical vulnerability


http://www.flickr.com/photos/mylesdgrant/2512410172/
The PHP Group released PHP 5.3.10 on Thursday in order to address a critical security flaw that can be exploited to execute arbitrary code on servers running an older version of the Web development platform.
The vulnerability is identified as CVE-2012-0830 and was discovered by Stefan Esser, an independent security consultant and creator of the popular Suhosin security extension for PHP.

SecurityFocus classifies the issue as a design error because it was accidentally introduced while fixing a separate denial-of-service (DoS) vulnerability in early January. It affects a number of Web development platforms including PHP, ASP.NET, Java and Python and can be exploited in a so-called hash collision attack. The PHP development team addressed CVE-2011-4885 in PHP 5.3.9, which was released on Jan. 10.

Friday, February 3, 2012

Display a banner each time Windows boots

  1. Start -> Run
  2. Type regedit
  3. Go to the key HKEY_LOCAL_MACHINE\SOFTWARE\Microsoft\Windows\CurrentVersion\WinLogon
  4. Create a new string value in the right pane named LegalNoticeCaption and enter the value that you want to see in the menubar
  5. Create a new string value and name it LegalNoticeText. Modify it and insert the message you want to display each time Windows boots.

How Websites Get Hacked With FileUpload Vulnerability?

The vulnerability which we are about to demonstrate in my opinion is the number 1 reason why websites hacked and are exploited further to the server level. When a hacker performs a SQL Injection attack on a website he needs a way to get shell level access and install the PHP backdoor so he can touch other files on server or compromise the server itself if it's vulnerable. If we could secure our uploads and restrict our upload area so that they don't allow it does not allow the upload of other files instead of images we can protect our upload area.

However there is a problem, The PHP files can still be uploaded by various methods. The most common method is by renaming the PHP backdoor to the following and then uploading the shell.

shell.php;.jpg
shell.php.jpg
shell.php..jpg
shell.php.jpg
shell.php.jpg:;
shell.php.jpg%;
shell.php.jpg;
shell.php.jpg;
shell.php.jpg:;
However there is also a method to block the upload of the above files. But there is also another way to bypass it even if the uploading of the files name with the above extension is blocked. We will use tamper data for this purpose.

Step 1 

Install http live headers firefox extention, then go to the upload section. Open Live HTTP Headers and upload shell. Now if you try to go to the link where you have your shell uploaded it will give you error (only on some websites) so we will have to change that hidden .php.jpg extension into the .php.

So as we uploaded the shell and opened the Live HTTP Headers you should find where you have uploaded your shell. You will have to find the line where ti writes that you uploaded the shell. Select it and then click on button reply.


Step 2 - 

After uploading, find the directory where your fle uploaded, example if you uploaded it in images then it will be in http://website/images/shell.php. The rest of the steps are self explanatory.


How To Protect Your Website from the FileUpload Vulnerability?

That's a separate topic and will be explained in a separate post. However for now I would recommend you to install a third party fileuploading service, Where the file get's uploaded the fileuploading service's server not yours.

Bring Back Default IE logo

Your browser logo shows something other than the IE logo. Maybe you have installed your ISP software and you have a different logo on the top right. How do you remove it?
  1. Close all browser windows
  2. Start -> Run
  3. Type RunDLL32.EXE IEdkcs32.dll,Clear
  4. Click on OK, and start Internet Explorer. You should find the old spinning IE logo.

Shutting down Windows the fastest way

  1. Start -> Run
  2. Type rundll.exe user.exe,exitwindows

Thursday, February 2, 2012

Local File Inclusion Vulnerability Demonstration - Shell Upload

Local file inclusion is a very popular web application attack, It was very common few years back. However now a days you will rarely find websites vulnerable to this attack. However a single vulnerability can result in getting your website compromised. We have already written an article on Directory transversal attack. Therefore I believe that we need no to go in details about the attack. You might know avinash by now the author of the previous article How Hackers Are Hacking Into Websites On Shared Hosts. However in this article he will demonstrate a local file inclusion vulnerability and he will enhance the attack by uploading a shell on the website.

Here are some of the common parameters which are vulnerable to local file inclusion or remote file inclusion attacks.

index.php?homepage=
index.php?page=
index.php?index2=

Requirements:

1) A Vulnerable Website
2) Remote shell ( http://www.sh3ll.org/egy.txt )
3) User-Agent switcher ( https://addons.mozilla.org/en-US/firefox...-switcher/ )
4) Mozilla Firefox

The first thing which a hacker will do while finding a LFI vulnerability is to locate the /etc/passwd file. This file indicates that a local file inclusion vulnerability is present in the website. The image below explains the whole story “root” is the username, followed by “x” which happens to be the password, however here it’s shadowed, which means that it’s present is /etc/shadow file. Which is only accessible when you have root privileges.


Next the hacker will check for /proc/self/environ. So change your path to /proc/self/environ/. The /proc/self/environ/ page should look something like this if the file exists, not all sites have it.


Once the local file inclusion vulnerability has been identified , the hacker will try to perform remote code execution and try to some how to further acesss. This can be done by uploading a PHP backdoor. For that purpose a commonly used tool is Useragent switcher. Which can be downloaded from the link above.


The hacker edits the useragent and changes code inside to the user agent to the following:


Select your User-Agent in Tools > Default User Agent > PHP Info (Or whatever you User Agent is called)


After refreshing the website, He then searches for the keyword "disable_functions" (Ctrl+F Search function)

disable_functions | no value | no value


The above function tells us that website is vulnerable to remote code execution and now we can upload the PHP backdoor. On the finding that the website is vulnerable he then tries to upload the shell by using the following command:


Where the above code uploads a PHP backdoor in a text form and later renames it to .php. Now the shell has been successfully uploaded. Once the PHP backdoor has been uploaded it will look like the following:


How To Be Protected?

We will cover it in our upcoming posts. If you are worried about your website's security and would like me to carry out a vulnerability assessment of your website. Feel free to contact me.

How Hackers Are Hacking Into Websites On Shared Hosts - Symlink Bypass Explained

You might have noticed a tremendous increase number of hack attacks on wordpress, joomla blogs and other content managing systems. What the hackers are doing is that instead of targeting the CMS itself meaning wordpress or joomla. They are targeting a vulnerable website on a server, Once they gain access to a single vulnerable website on the server, They upload a shell and with a method called "Symlink Bypass". They manage to extract the configuration files of another website hosted on that same server and later on using a simple MySQL interface they connect to that website.


Avinash, a security student and researchers will explain step by step how hackers hack into websites on shared host with the method called Symlink bypassing.

What Is Symlink Bypass?

Well, I would not like to go into much detail. However for your understanding all you need to know is that symlink is a method to refrence other files and folders on linux. Just like a shortcut in windows. Symlink is necessary in order to make linux work faster. However symlink bypassing is a method which is used to access folders on a server which the user isn't permitted. For example the home directory can only be accessed by a root level user. However with symlink bypass you can touch files inside home directory.


Step 1 - The hackers searches for a vunerable website on a server. A hacker can get list of domains on a webserver by doing a reverse iP lookup.

Step 2 - Next the hacker hacks into any vulnerable website on the server and upload a PHP shell.


Step 3 - The above picture demonstrates two files one named .htacess and the second named jaugar.izri being uploaded to the server. Here is what Jaugar.izri looks like when it's made public by adding 0755 permissions.


Step 4 - The hacker connects to the izri script and then gives the following commands

mkdir 1111
cd 1111
ln -s / root
ls -la /etc/valiases/(site.com)


The first command creates a directory named 1111(Mkdir 1111). The next command navigates to the directory(cd 1111). The third command creates the symlink of the root. The fourth command will extract the user name of the website you put in place of site.com. 


The target website is entered in ls - la /etc/valiases/site.com.


The above screenshot explains the whole story. The hacker then navigates to the "1111" directory and the configuration file of the target website is created there. The hacker downloads the configuration files and uses the information to access the database and there he can make any changes