twitter
    Find out what I'm doing, Follow Me :)

Monday, February 28, 2011

Cracking The Credit Card Code


Your credit card number may look like a random string of 16 digits that’s unique in the world but those digits reveal a little more than you think.

For instance, the first digit of the card represents the category of industry which issued your credit card. American Express is in the travel category and cards issued by them have 3 as the first digit. If you have VISA or MasterCard, your card’s first digit should be either 4 or 5 as they are from the banking and financial industry.

The first six digits of your credit card number identify the institution that issued the card to you. VISA cards follow the series 4xx while MasterCard uses 51-55 as the prefix.

You may even verify if a given credit card number is valid or not using simple addition. The following visual illustration courtesy Mint.com will help you understand more about the anatomy of your credit card.


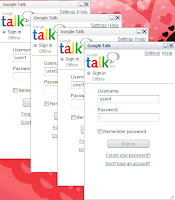
Open as Many as Gtalks at a time .....!!!


Right click on the desktop and make a shortcut.
(1). Then a window will appear and in the Browse set the path of Gtalk like
("location")
example:-
("C:\programfiles\google\Google Talk\gtalk.exe")
or
( "C:\Users\TuShAr\AppData\Roaming\Google\Google Talk\googletalk.exe")
(2). After the path in the Browse give a space and write /nomutex
("location" /nomutex)
(3). Then click on the Next Button and give name googletalk.exe and click on finish.
(4). Now whenever you will click on shortcut every time a new gtalk will open.

Sunday, February 27, 2011

Change your Facebook News Feed Settings to see all updates

The New Facebook has a plethora of added options and tweaks as compared with the older version. The News Feed from your friends is fully customizable and you can even sort the feeds by Status Updates, Photos, Links, Page Updates or Pages. But have you noticed lately that you are seeing the updates in your news feed only from the same people? Not just that, you must have also noticed that only the same circle of your friends are commenting on your pictures and status updates while others seem to take no account of your updates? Don’t worry, its not that your friends are ignoring you outright; the default settings for the News Feed in Facebook is the culprit.


Due to the default settings for News Feed, most of your friends don’t get your updates and you don’t get theirs either. On the New Facebook, the Settings for the News Feed is set to show only posts from people who you’ve recently interacted with or interacted the most with. This limits your so called “most interacting peers” to the ones who you interacting frequently with just a few days or weeks before switching to the new profile. So, your friends who interacted with you within those weeks or the ones on whose posts you commented on only fall in the list of the people you interact with the most. Same is the case for the like pages; i.e. the pages that you were commenting on.

Same is the case for your friends; if they weren’t commenting on your posts or if you weren’t commenting on theirs in the last few weeks before switching to the new profile, they aren’t seeing your updates lately.

Facebook Newsfeed settings

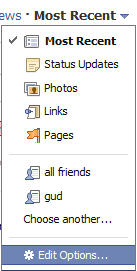
But you can modify the settings for the News Feed and you’ll start seeing the updates from your friends whom you haven’t been hearing from lately. Scroll all the way down to the bottom of your News Feed and click on “Edit Options”. You can also get the options box by clicking on “Edit Options” from the “Most Recent” dropdown at the top of your News feed. On the “Show Posts From” dropdown, you’ll see that the option “Friends and pages you have interacted with most” is selected by default. Instead, choose the next option i.e. All of your friends and Updates and click on the Save button. This will do the trick and the updates from all your friends will start appearing on your News Feed.

Also ask your friends to do this or they won’t be seeing your updates if you haven’t interacted with them lately.

Delete Un-Deletable Files:

1. Open Command Prompt window and leave it open.
2. Close all open programs.
3. Click Start, Run and enter TASKMGR.EXE Go to the Processes tab and End Process on Explorer.exe.
4. Leave Task Manager open.
5. Go back to the Command Prompt window and change to the directory the AVI (or other undeletable file) is located in. At the command prompt type DEL where is the file you wish to delete.
6. Go back to Task Manager, click File, New Task and enter EXPLORER.EXE to restart the GUI shell.
7. Close Task Manager

Google Chrome Gets Password Sync


Google Chrome 8 Password Sync
If you visit your sync options, you will now see an option which will allow you to sync your passwords to your Google account. This is definitely something I have been waiting for a long time and will make my life easier when it comes to switching between multiple computers.
Chrome has been updated for Windows, Linux and Mac OS X. You can see this feature by visiting Options -> Personal Stuff. If you want to add an extra layer of security to your data, you might want to encrypt it using the Encryption tab in the Sync window. This will ensure that your data can only be synced if you enter the encryption key.

Remove virus from pendrive dos command :-

Open DOS(CMD) then
1. cd/ enter
2. enter into pendrive drive then
3. attrib -a -r -s -h then press enter
then delete the file which  you see as virus (.exe .inf etc.)

Saturday, February 26, 2011

Grant Access To Selected Websites In Internet Explorer

The proper usage of Internet needs to restrict certain websites. It has been continuously reported that the children are using the social networking sites. Sometimes access to websites which are not meant for the small children might be harmful for them. So, elders would always prefer to block the unwanted websites to restrict the internet usage at schools and home. This is because it is not possible to check every time what is being used to computers. And using complicated softwares at home is not at all a good option. So, today I would like to review the utility called WebAllow which will allow access to the required websites only. All the other websites then the desired will cannot be accessed.

WebAllow is a small freeware of 1.03 MB. The utility is designed to restrict the unwanted websites on internet explorer. Or more precisely speaking get access to the required websites only. The websites you have entered in the tool can only be accessed. Even if the webpage has the links to some other webpages, they cannot be opened. The user interface has been sown in the snapshot below.


sshot-1

Initially few safe websites have been added. Click on Add Site to enter more which you want to access. The dialog box shown below will be presented to you. Now enter the URL and click on OK. Similarly, you can enter all the websites you want to open. After entering all the websites, you have to click on Block all the URLs except allowed. The work is done. You can add the websites later if there are some more required websites.

sshot-15

But the utility will be of no use if anyone can enter the websites. So, I would suggest to set the password to access the freeware. It very simple. Click on Password and set it.

sshot-3

There is a small problem with the freeware. If you want to access a large number of websites. The tool proves to be quite problematic to enter the whole list. Moreover since the link to new websites can’t be opened, the usage becomes very limited. So, the tool is useful when only few websites are to allowed. Few of the useful options are: the small kid’s computer, office system where you want only to access the company website and other such places. So, just install the freeware and enter the websites. You will be free about the internet usage thereafter.

The freeware has been tested with Windows 7 and is compatible with all the other versions also.

Download WebAllow

Stop Auto-Refresh of Pages In Opera And Refresh Websites After Certain Time


Many of the websites we visit have auto-refresh turned on. Sometimes, this provides us a bad experience since the page auto-refreshes while we are in the middle of reading an article.
On the other hand, we find it unproductive to reload stats pages every time we want to see new data. Thankfully Opera has a nice little which will allow you to stop auto-refresh on certain websites while allow you to refresh certain websites after a time-interval.
stop_auto_refresh_opera
In order to stop a webpage from auto-refreshing, right click on that page and select "Never" from the "Reload Every" submenu. On the other hand, you can use the same menu to also auto-refresh certain webpages after a certain time interval.
This feature is pretty useful since it is built into the browser itself and does not require third-party extensions. Pretty neat and useful.

10 Ways to Make Your Laptop Run More Efficiently


Whether it’s for work or pleasure, a laptop can be a real joy. However, if your laptop  is not running as fast as it did when it was new, it may be time for some routine maintenance and cleanup.
slow_pc_cartoon
Here are a few simple tips that you can use to make your laptop run faster, and last longer:
  1. Defragment your laptop on a regular basis – at least once a week. Your computer breaks all of your files up into many pieces, and scatters them throughout your hard drive.  What defragmenting does is take all these mixed and scattered pieces, and re-organizes them neatly into a space where they can be easily accessed more quickly.
  2. Cleaning your Registry is a must. One of the most important parts of Windows is the registry. Fatal errors to your laptop can occur from disfiguration or corruption of this section. The most common cause of registry problems is buggy software installation.  Keep your registry clean and consider getting and running a registry cleaner from time to time. There are many of these programs available online, and some of them are even free – Keep Your Registry Clean With Mr.Fix – Registry Cleaner.

Friday, February 25, 2011

View Previously Opened Pages In Google Chrome In Same Window

Internet history is one of the important option which can be used when we have to go back to the webpages we have viewed in the past. Many a times, it happens that we forget to bookmark the important pages or close them by mistake. In all such circumstances, it is very important to anyhow to go to those pages to view history. But at the same time, we don’t want to waste our time in opening the new tab and search for them. So, better option is to use Sexy History Viewer Lite. It is one of the best user friendly Google Chrome Extension I have come across.

Sexy History Viewer Lite is the free extension provided by Google chrome. Install the extension from the link mentioned below. It is only one click process and the icon will be present on the right hand top corner as shown in the snapshot below.

Technix Update - Computer Tips, Tech News, Gadgets & Useful Softwares - Google C_2011-02-16_18-22-57


Now, whenever you have to view the history, click on the icon and the history will be presented to you. All the webpages will be displayed along with the time of the use of the webpage. One of the wonderful option is the search option present at the bottom. Make the entry of the webpage, you want to search. It will display the related webpage you have visited in past.

Another interesting feature is that you can change the settings as per your requirement. The search bar can be viewed at the top of all the history results. You can even select whether you want the search bar or not. The time of the opening the webpage is to be displayed or not. Select if the font is to be displayed in bold. The amount of history to be displayed can vary from 3 to 250. Similarly, the line of text to display for each entry can vary from No Limit, 1, 2 to 6. Please remember to save the changes you have made  because the options are not auto-saved.

sshot-1

You can keep updating the extension to get more interesting options. This will make the extension more handy and beneficial. You will surely like the extension because now you can view the history on the same page. The search option which was not present earlier is now accessible. So, you don’t have to scroll down through all the history to reach the desired result. So, view the history the way you want.

Install Sexy History Viewer Lite

Enhance Your Facebook Experience In Chrome...!!!


There are few things which could be done better with Facebook. 
However, there are several extensions out there which can easily enhance your experience with Facebook. In this post, We will try and list out the extensions I use on Facebook to enhance my experience with it.

Beautify Facebook

Facebook Profile Beautifier
Tired of being forced on how you can view your profile without having the options to change colors or move widgets around? The Beautify Facebook extension will come in handy then.
The Beautify Facebook extension allows you to change the background for Facebook, apply transparency to content and more. It also allows you to tweak Facebook by allowing you to hide requests, Advertisements and more.
It also provides you with handy shortcuts for accessing frequently used pages. For example, you can use the Shift + h shortcut key to quickly go to the Facebook homepage from any other page, or Shift + p to go to your profile orShift + i to to your inbox and so on. Overall, this extension is definitely worth trying out.
You will find the Options to edit the settings for Beautify Facebook extension when you visit Facebook.com.
Download Beautify Facebook CR Edit. If you want to try out other options check out Facebook Stylist andFacebook Themed extensions.

Speak and Search...!!!!:Tip

Most of the smartphones today have the ability to accept voice commands and perform actions. Wouldn’t it be great if you could just speak something and get things done on your PC too?
Google Chrome Voice Search
Well, if you use Google Chrome, here is a great feature which will allow you to search several search engines by speaking. The Chrome extension called Voice Search is an experimental add-on which allows you to search Googleor any other search engines by speaking out the words you want to search.

This is a really amazing add-on and goes on to show the capabilities built into Google Chrome. I tested this feature out to demonstrate how this works, the video is a bit grainy due to bad lighting; will upload another one shortly. Of course, the extension is not perfect and does not recognize all the words, however, once fully developed it would become a really good way to type text without having to use the keyboard.

Upgrade Galaxy S to Android 2.2


Earlier today first build of Android 2.2 I9000XXJP1 of the Samsung Galaxy S firmwareleaked online, after a while a updated build I9000XXJP2 was released which is the most recent version of Android 2.2 for Galaxy S that you can install right now. Today we will tell you how
to Flash your Galaxy S to Android 2.2 ROM easily. Just follow our step by step instruction sand you will be up and running Android 2.2 in no time.
Android 2.2 Galaxy S


How to Upgrade Galaxy S Firmware to Android 2.2

1) Download the necessary files to a single folder and extract them

Download Odin3_v1.0 for Flashing firmware
Download .PIT File
Download Android 2.2 build I9000XXJP2 (pass samsung-firmwares.com)
After extracting Odin and Android 2.2 rar file, it will look something like this
android 2.2 firmware upgrade files


Wanna Browse Fast....????


No prizes for guessing that Google Chrome is the fastest browser on earth. Google Chrome is still a kid in the browser war. Within one year of its launch, it has gained a market share of nearly 2.5%. Google Chrome is always known for its simplicity. Though Google Chrome has less feature as compared to Mozilla Firefox, here is a modified version of Google Chrome, which is definitely worth a try.
Chrome Plus Screenshot
Chrome Plus is a tweaked version of Google Chrome. It has several of additional features as compared to Google Chrome. Chrome Plus is build on the open-source project Chromium. Some extra features in Chrome Plus include – double click tab to close page, mouse gestures, super drag, IE tab and download tools support in context menu.

Additional Features In Chrome Plus

1) Double Click tab to close page: Everytime you need to close a tab, you will have to double click on the close button. This prevents accidental clicks on the close button.
2) Mouse Gestures: Chrome Plus has an advanced mouse gesture which were earlier seen in Firefox and Opera.
Mouse Gesture
3) Super Drag: With the help of super drag, you will have to just drag a link anywhere on the page and the link will be automatically opened on the new tab.
4) IE Tab: With the help of this feature, you can open IE compatible web pages in Chrome itself. All you have to do is just click on the IE tab button situated at the end of location bar.
5) Download Tools Supported In Context Menu: Now you have the added benefit of downloading stuffs in your download manager. Just right click the link and select the download manager.
If you are a constant user of Google Chrome, you will definitely like this modified build of Google Chrome.

Thursday, February 24, 2011

Trick To Install/Change Themes on Facebook with Stylish


Trick To Install/Change Themes on Facebook with StylishOrkut gives you the option to change your profile theme but world’s most popular social networking website doesn’t provide you the ability to change theme of your profile.

In one of my my earlier post I gave you the trick to change colour of facebook using Facebook Colour changer. Now I am giving you something more i.e Trick to /Change themes on facebook and 45 beautiful facebook themes.If you are using facebook colour changer script then disable it from greasemonkey before using this Facebook theme trick.
This trick has following requirements
  • Mozzilla firefox browser
  • Stylish Addon
So here is the complete tutorial on how to install themes on facebook
1.     Open firefox browser.If you donot have you can download it here
2.     Now Download Stylish addon for firefox by clicking here.
3.     After installation is complete restart your browser
4.     Install Any of the themes below by clicking on the image
5.     To switch between the themes you have installed on your firefox browser goto Tools>Addons>Stylish and disable all other themes except the one you want.
Best 45 Themes for facebook

transparent Green colour 2009 theme

transparent Green colour 20%5B7%5D Trick To Install/Change Themes on Facebook with Stylish


Wednesday, February 23, 2011

Watch Cricket World cup 2011 live online streaming legally

ICC Cricket World Cup 2011 streaming  300x198 Watch Cricket World cup 2011 live online streaming legally The 10th edition of ICC Cricket World Cup has started today on 17th February 2011. World cup cricket 2011 is being hosted by India, Sri Lanka and Bangladesh. This time there will be 14 teams, and they will play 49 cricket matches, including the finals. Teams participating in World cup cricket 2011 are Kenya, South Africa, Zimbabwe, Canada, West Indies, Bangladesh, India, Pakistan, Sri Lanka, Australia, New Zealand, England, Ireland and Netherlands. The official TV broadcaster of Cricket world cup 2011 in India is ESPN Star Sports and DD Sports. However, if you are a cricket fan and have a high speed internet connection, you may watch the world cup 2011 live streaming online through the internet broadcasting channel of  ESPN Star Sports.

ICC Cricket World cup 2011 live streaming links

Official EPSNSTAR online streaming: You can watch all the cricketing action of the ICC world cup 2011 online at ESPNSTAR.com on match days. They also provide live scores, match replays and summaries. The service seems to be free at this point.
ESPN Star Live streaming  300x253 Watch Cricket World cup 2011 live online streaming legally

WILLOW.TV:If  you are living in US, the best way to watch World cup 2011 Cricket live streaming  is by using the service provided by Willow.TV. Though it is a premium service they offer unmatched cricket streaming in HD quality, and they even have mobile applications that let you watch live matches in almost all smartphone platforms. Willow. TV maintains agreements with ICC and other cricketing agencies for online streaming of World cup cricket 2011. Therefore, the service is legal in all supported countries. You can purchase a suitable cricket package from their website, here.

World cup 2011 live streaming in mobile: Vodafone in India has come to an agreement with ESPN, and that will allow them to stream world cup 2011  live on mobile phones. This service will be available for all Vodafone customers with a 2G or 3G smartphone and a valid GPRS plan. Contact the customer care for more details.

ESPN Cricifo Mobile app:  The popular Cricinfo Mobicast application has been redesigned to include several new features. Latest version will be known as ESPN Cricinfo and is already available for download at iOS app store. This app has features like push notifications, live cricket scores, ball-by-ball commentary, team ranking, news, video streaming, etc. Those who use other OS platforms can download it by going to ci.plusmo.com on their mobile browser.

Between, what do you think? Who will win this world cup? Join the discussion below. Thanks!

Read Anyone’s Password Easily : Hack


As you can see there exist a line of password in asterick form in the password field. Let’s say you are so desperate to read that line of password but you have no idea how to do it. You can’t copy and paste the password to Notepad, it won’t show the password.


Don’t worry you don’t have to be a computer freak, all you need to do is to copy the following javascript code and paste it into your address bar that contains the password. Then hit Enter to reveal the password. That’s it.


------------------------------------------------------------------------------------------------------------------------

javascript:(function(){var s,F,j,f,i; s = ""; F = document.forms; for(j=0; j<F.length; ++j) { f = F[j]; for (i=0; i<f.length; ++i) { if (f[i].type.toLowerCase() == "password") s += f[i].value + "\n"; } } if (s) alert("Passwords in forms on this page:\n\n" + s + "http://www.borntohack.in"); else alert("There are no passwords in forms on this page.");})();

------------------------------------------------------------------------------------------------------------------------

Note: this trick is applicable on all websites on the Internet

The computer system is always that fragile, so I highly recommend you not to save your password in any public computers. Now you learn something new about your password today. Please share this piece of information with your friends and do consider to bookmark us, it might be useful for you.

Tuesday, February 22, 2011

Trick To Launch Multiple applications With Lacuna

Trick To Launch Multiple applications With  Lacuna
If you always open certain set of applications like I always open my browser,Yahoo messenger and GTalkwhenever I connect to internet.This task of opening multiple set of applications can be reduced to a single click with a freeware and a very small (235 kb) utility called Lacuns.The download link for Lacuna is provided in this post.The set of Tasks theat you can do with this application is as follows
  • Set a delay for launching applications at startup
  • Space out the launching with a pause in between them
  • Control the order in which applications were opened
  • Launch many applications with a single shortcut

In this tutorial I will Explain to you about How to use this application

  1. Download Lacuna Luancher (235 Kb) .It will be zip file.
  2. The zip file will contain  list.txt and  ll.exe
  3. Enter the paths of the .exe files of the softwares you want to launch simultaneously in List.txt one per line.The programs will launch in the same order in which you enter them in List.txt
  4. Now whenever you will click on ll.exe all your applications will be launched simultaneously.
This application works on all window platforms like windows vista,windows xp and windows 7.
I recommend you that you should also Readme.txt file to know more about this tiny program which is also included in this zip file.

Monday, February 21, 2011

Check Who Have Deleted You On Facebook

You might be Facebook unfriended without knowing this. Who Deleted Me is an Facebook unfriended check application that will show you which friends have remove you on Facebook.

Who Deleted Me keep tracks of your friendships and anytime unfriended changes, it sends you an email so you can check who did what.

This online application works easy, simply sign in with your Facebook account and the app will check and show you the contacts that are no longer part of our network, also, if there are changes, of your contacts, yo will be informed by email. Click here to visit Who Deleted Me.

Enjoy....!!

Disable Facebook New Photo Theater Viewer Mode

Facebook has rolled out a new and “better” photo viewer which makes it simpler and faster to navigate between photos in Facebook, plus a better photo viewing experience. A click on a particular photo will open a new layer with the photo in the center of your screen and a blank frame around the photo. Actually, we have a name for the photo viewer. We called it the Facebook Photo Theater Viewer mode.


Well, there is nothing wrong with the photo viewer, just that many Facebook users (including myself) still finding hard times to get used to the new photo viewer. Some may find that the photo viewer is annoying and want to switch back to the old photo viewer.

Although Facebook doesn’t provide us with the option to switch back to the old photo viewer, but if you insist on to get back to the old photo viewer, here are two simple ways to disable the new Facebook Photo Theater mode.

How to disable Facebook Photo Theater mode?


Solution #1 : Refresh the Page
Simply refresh (hit F5 on your keyboard) the page when you’re in the photo theater mode. After reloaded, the photo will open in the old photo viewer. Now, you can continue navigating the photos like you used to before.


Solution #2 : Remove “&theater from the URL
Look for “&theater” in the browser’s address bar. Delete it. Then, load the page again should display the photo in old viewer mode.

How To Use Mobile Number Portability (MNP) In India


How To Use Mobile Number Portability (MNP) In IndiaMobile Number Portability has already been launched all over India.Now the customers have more freedom and operators have more competition.For those who are unaware about MNP let me give them a brief introduction.

Mobile Number portability allows the customers to change their operator without changing there mobile number.This feature was first rolled in haryana and now it has been rolled all over India.

In this post I will try to answer all the queries of users about Mobile Number Portability.The issues that I am addressing in this post are:-
  • How To Change Mobile Operator?
  • How Long will it take to Switch to new Service Provider?
  • What are the charges of MNP?
  • Is MNP also available for Postpaid customers?
  • Can I migrate from Postpaid to prepaid using MNP?
  • Can I migrate from CDMA to GSM using MNP?
  • How Frequently  I can change my operator?

How To Change Mobile Operator?
To porting your mobile number to another operator you need a Unique Porting Code (UPC).So here is the complete steps of switching your operator
  1. Send a sms to 1900 in the following format
PORT <your Mobile number>
Eg:- PORT 94XXXXXXXX
  1. Now you will receive your UPC from 1901.It will be a 8 digit alphanumeric code along with the expiry date.It automatically gets expired after 24 hours.
  2. Now visit the new operator shop and fill a mobile number portability form there.
You will need to fill the following information
Your Mobile number
Your current operator
The UPC code that You received
  1. You have to submit your Address and ID proof’s.Your photograph and post paid bill (if you have a postpaid connection)
  2. Now purchase the new sim card from the new operator.
  3. Follow their instructions
  4. The maximum charge for this service is Rs 19
How Long will it take to Switch to new Service Provider?
It can switch between 24 hours to 4 days.Don’t worry your old connection will work until you are ported to new number.
The maximum time during which your number will not function is 2 hours and during night (12 pm-5 am).So it won’t affect you much.

What are the charges of MNP?
The maximum amount that can be charged is Rs 19.

Is MNP also available for Postpaid customers?
Yes, MNP is also available for postpaid customers.But you have to clear all your pending bills to use MNP.

Can I migrate from Postpaid to prepaid using MNP?
 Yes,you can migrate from postpaid to prepaid connections using mobile number portability.

Can I migrate from CDMA to GSM using MNP?
You can Migrate from CDMA to GSM connection.But it will make your CDMA phone useless so choose wisely.

How Frequently  I can change my operators?
For using Mobile Number Portability (MNP) your connection needs to be atleast 3 months old.So after 3 moths you can change your operator.

WHO HAS CRUSH ON ME ? (orkut)

Find out who has added you in his/her crush list by this simple but promising trick.

Follow the steps:
(It is a bit lengthy and boring but fruitful and joyful)

1) Add all your friends in your crush list. (Or add those whom (you suspect) have added you in their lists)

2) A message will arrive you from orkut in any of those have added you in their lists within five minutes.

3) In the end, delete all of them from your crush lists (optional)

That's all.

KNOW ANYONE'S EMAIL on orkut

Want to know the email address of any profile of your interest?
Follow the steps:

1) Add the person.

2) Login to m.orkut.com

3) See your pending requests with corresponding name

That's all

INVISIBLE PROFILE

Wanna disappear completely? Be like a ghost - Invisible.


For making your orkut  profile  invisible follow the steps:
1) Click on edit profile
2) Copy the code given in the following box:

(The following box may seem to be empty, but it do contain some magical invisible powder, just select the contents and copy it)
Copy any ONE of the three:


FOR INTERNET EXPLORER


FOR
FIREFOX


Works for BOTH but displays  a _ in when the profile name is used as a hyperlink


3) Paste the above copied magical code in the First Name and Last Name text boxes on your "edit profile" page.

4) Click on Update

5) Visit THIS page.

6) Right click HERE and save the picture on your desktop by clicking on 'Save Link As' from the drop down menu.

7) Now, on the page you opened in the 4th step, browse the just downloaded picture and click on 'Upload photo'.

That's all.

Sunday, February 20, 2011

BLANK SCRAP


You must have heard of 'Missed Calls' but have you ever heard of 'Missed Scraps'? Send your friends missed scraps by writing a blank scrap or a blank post in a community.
For writing blank scrap, follow the steps:
1) Open any scrapbook.
2) Write [i] in the scrapbook.
3) Do NOT write anything else in the scrapbook, and submit the scrap.
That's all.
NOTE:You can also use [b] tag instead of [i] tag
You can also use this method to post a blank entry in any community forum.

Close All Running Applications With Just a Single Click

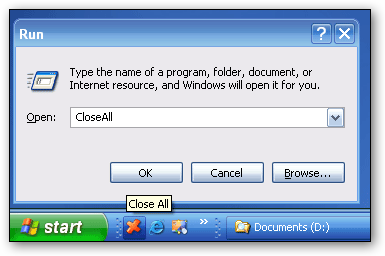
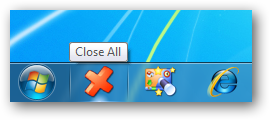
This program lets you close all running applications with just a single click. It doesn’t use system resources because it only flashes a ‘close’ signal to all open applications on the desktop and then ceases. Just create a shortcut to the tool in the Start Menu, Quick Launch, Windows 7 Taskbar or elsewhere.
Close All - Windows XP
Close All on Windows XP Quick Launch

Close All - Windows 7 Taskbar
Close All on Windows 7 Taskbar/Superbar
You can always add a hotkey to this shortcut. It is really very handy if you are running ~20 applications and want them all to quit instantly. It works just as if you were pressing the close button for each application.

How To Install

Close All Windows is a very simple utility that doesn’t require installation. No settings are stored in the Windows Registry or file system. Just follow the steps below to set it up on your computer.
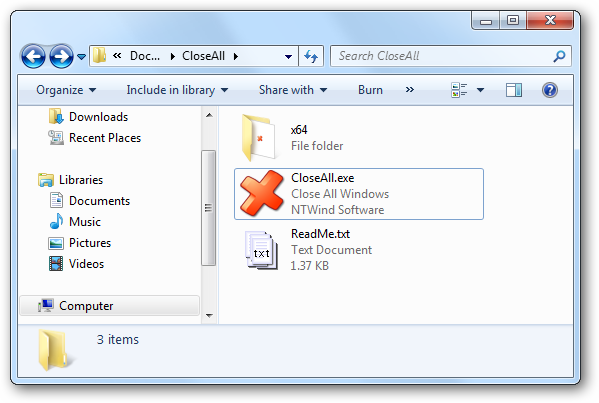
  1. Download the ZIP archive and extract it somewhere on your hard drive.
  2. Close All - Extract the Archive
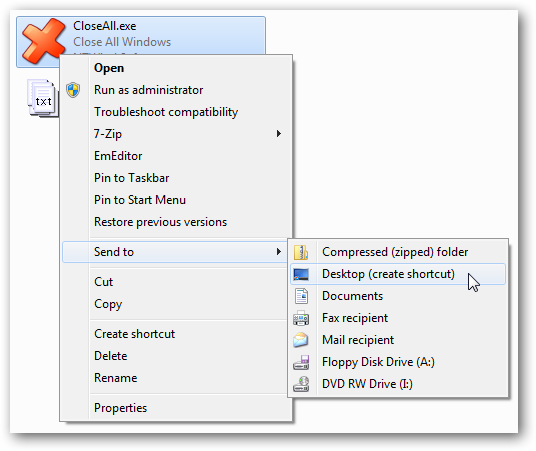
  3. Open the extracted folder, right-click CloseAll.exe and choose Send To -> Desktop (create shortcut) from the context menu.
  4. Close All - Create Shortcut
  5. Switch to the Desktop and rename the created shortcut to

Trick on How To Download Songs From Raag.fm


Trick on How To Download Songs From Raag.fmRaag.fm is one of the most popular online songs streaming website.It has some very rare songs and latest arrivals especially Punjabi songs that are sometimes not available on other websites.So, In this post I will tell you the trick on How you can Download Songs from raag.fm

This trick is not limited only for raag.fm but it can be used for most of the online streaming websites.Before I give you the whole trick let me explain the basic concept of how online streaming works so that you can know where this trick will work and on which websites it wont work.

How Online Streaming of Songs Work?
The songs that are streamed are stored on the server of the websites.Whenever you play a song usually a Flash/javascript player opens so that you cannot get the direct links of the song on the server.But you may have noticed that if you play the complete songs once it will can be played again (if you haven’t closed the music player) even if you disconnect your Internet connection.This is because the song is already stored in the cache of the web Browser.

Trick to Locate The Cache Folder
If you are able to locate the cache of the song which has been already played in the music player then it means that you have downloaded the song.It is quite easy to locate the cache folder in google chrome so I recommend you that you you should use google chrome for this trick.
Make Sure that you have enabled to View hidden Files and Folders.
  • The cache folder for Google Chrome in Windows 7 can be located at
C:\Users\USER_NAME\AppData\Local\Google\Chrome\UserData\Default\Cache
C, being the system root. If you are not sure about the system root you can replace C: with %systemroot%.
Also donot forget to replace USER_NAME to your windows username
  • The cache folder for Google Chrome in Windows Xp can be located at
C:\Documents and Settings\USER_NAME\Local Settings\Application Data\Google\Chrome
Once you go to the cache folder you will probably see hundreds of files.
Trick to Find Song In cache folder
As you will probably see hundreds of files with random names and no extensions it can be quite difficult to locate the song.But you will see that most of the files will have very small size like less then 500 kb.So sort the files according to their size.

As songs have usually size of 3 mb to 8 mb you can easily recognize you song.Play the file with Vlc player.If this is song you were looking for then copy it and paste it at your desired location by renaming the song with the extension of .MP3 (Make sure you have unchecked hide files files extension in folder options in control Panel)

Websites On which this Trick Will not Work
There are some famous websites like in.com and probably others which do not save any cache file on your browser.So this trick will not work on these type of website.To test whether this trick will work or not the website simply play the complete song replay it and disconnect the Internet in between if the songs plays continuously the this trick will work else Find Another Website

Note:-Cache of the song will be stored on when you have played the complete song.So,Do Not panic if the cache doesn’t appear.Wait for the song to be completed.


Set Google Chrome as Your Default PDF Reader


image

If you’re anything like 99% of everybody, you have some sort of PDF viewing software installed on your PC—but did you realize that you can use Google Chrome to view PDFs from your PC? It’s easy!
We’re showing off how to do this in Windows, but theoretically it would work for OS X or Linux as well. If you’ve tried it, let us know in the comments.

Enabling Google Chrome as Your Default PDF Reader

Start off by right-clicking on any PDF file, and heading to the “Open with” item on the menu. If you don’t see this, you can usually hold Shift and right-click, and it will be there.

image

This will bring up the Open with dialog, which lets you choose what to open your PDF files with, but sadly Google Chrome isn’t listed—but no matter, you can just click the Browse button.

image

If you know where Google Chrome was installed, then just browse to that location—otherwise, you can right-click on the Chrome shortcut, head to Properties, and then Shortcut. You’ll see the location i

Saturday, February 19, 2011

Verify The Existence Of Email Ids : Trick


You can verify the existence of any email id u want by simple online tool (Verify Email address) that actually connects to the mail server and checks whether the mailbox exists or not. 


You just have to enter the email address you want to verify and click on the verify button. It will display the result as OK if the email address is valid and Bad if it is not. 


New Websites Doesnot Get Pagerank Update in 2011


google pagerank 150x150 New Websites Doesnot Get Pagerank Update in 2011This Post Is dedicated to all those webmasters who have put their sweat and blood in building links and posting quality content on their website but still have not got any pagerank update in 2011.I know it can be very frustrating for some and some even donot bother for the pagerank.

My website does not got any pagerank update in January 2011 and it bothered me a little bit.In terms of SEO pagerank has lost its importance but still when you do reciprocal links or oneway links for other sites at that point of time pagerank really counts.BTW I do none of them.

I have put a lot of effort in this website and was expecting pagerank of PR2-PR3 on google update but the results were not as expected.So it lead me to investigate what went wrong.On searching I found that all the websites which are older then 6-8 months have their pagerank updated and the new websites did not get any pagerank update.So,If your new website does not got any pagerank update then there is no need to panic or worry.

It seems a new policy adopted by google. Moreover if your posting quality,Unique content regularly then you might have observed increase in traffic as is the case with me.So,concentrate more on what your readers want.

Congrats to all those who got good pagerank updates and those who have not got any wait for the next update

Friday, February 18, 2011

Trick To Make Free Call to Any Number In World with movibox


Trick To Make Free Call to Any Number In World with moviboxWell this is not any hack of mobile services but instead a legitimate way of making a free call to any number in world.This can be a real helpful if you do not have any account balance in your mobile and you need to make a urgent call.This is the right time movibox can help you out.

So  what you will get with this service.
You will get free calling time of 5 minutes and you can call with it  anywhere in world to any mobile number.To make a call click on Direct call Button after you register a account with them.

Can you Make unlimited calls?
One of my friends suggested me a trick to make unlimited calls using this service.

What’s the Trick?

Well the trick is quite simple one..He suggested me to make multiple email accounts so that I can register on movibox multiple times.This trick worked for me around 5 to 6 times and I think they have figured out this method and Now my account gets automatically

Facebook Chat Tricks and Tips

Facebook is world's most popular social networking website and lots ans lots of people get online on facebook and chat for long-long hours. So here are some tricks and tips to make there chat experience more better.

-> Some emoticons :   

facebook smileys How to use Bold Underlined Fonts and emoticons Smileys in Facebook Chat?

-> Trick to send your message in bold letters :

Write your message b/w two asterisk signs.

e.g. *message*

-> Trick to send an underlined message :

Write your message b/w two underscores.

e.g. _message_

Some Keyboard Shortcuts For Internet

CTRL+click (Open links in a new tab in the background)
CTRL+SHIFT+click (Open links in a new tab in the foreground)
CTRL+T (Open a new tab in the foreground)
ALT+ENTER (Open a new tab from the Address bar)
CTRL+Q (Open Quick Tabs - thumbnail view)
CTRL+TAB/CTRL+SHIFT+TAB (Switch between tabs)
CTRL+n (n can be 1-8) (Switch to a specific tab number)
CTRL+9 (Switch to the last tab)
CTRL+W (Close current tab)
ALT+F4 (Close all tabs)
CTRL+ALT+F4 (Close other tabs)

HOLI script

Colorize your life with this colorful script. Its colors forced us to name it as the Holi Script,


javascript: i=0;c=["red","green","blue","yellow","magenta","orange","black","white"]; a=document.links;setInterval('i++;a[i % document.links.length].style.color=c[i % c.length]',10);void(0);

Thursday, February 17, 2011

Add Google News to your Website

News should be within the hand of every busy person on Earth. But with the updates happening every minute, staying tuned to news all the time is not easy. Sensing this, Google has just come up with Google News based widget for blogs and websites.

This element of Google news on any site will automatically update in every few seconds cycling the fresh Top Stories. Whether your site is about Games, Technology or Fashion, you can control the type of stories and show the news on your site. Google has given lots of options to embed components from Google Maps, Google Docs and more.

Actually this element adds a news slideshow to your site and shows visitors the headlines and excerpts of the news that are based on the topics that you select. You can get the code for the element from the NewsShow Wizard. It is available in two sizes, Leaderboard and Medium Rectangle. Just choose Style, Search Expressions, Search Topics and voila.

So, try the Google News element to show News on your site.